


Flexible full-analog mastering matrix for 8 stereo hardware devices and total recall via DAW plug-in. Includes built-in LR-> MS- and MS-> LR matrix.
Integrate all your hardware for sum processing with the Konnektor in your favourite order.
Full analogue signal path.
Connect up to 8 analogue stereo units.
Arrange your signal path by drag & drop inside of your DAW.
Save your settings with the plug-in in each song.
Create presets with your favourite combinations. Do you always start your mastering with the same devices? With the presets you’re ready to go!
Test different order settings by stepping the presets. What sounds better, the EQ in front of the compressor or the other way around? It only takes a second to find it out.
The Konnektor offers additionally two analogue hardware plug-ins for LR->MS and MS->LR-encoding.
You like to make the bass mono compatible with the hardware EQ? No problem at all. Drag the LR->MS plug-in before the EQ in your signal path and the MS->LR plug-in after the EQ. Now turn the bass down in the right channel of the EQ. Done.
Now do you like to compress the mid and the side signal? Insert your compressor before the MS->LR plug-in.
Do you like the EQ after the compressor? Just move the compressor up one slot. The rest adapts automatically.


Upload the images of your hardware into the Konnektor. Now your virtual rack looks like your studio. The images of all of our products are Pre-installed already.


Konnektor - Analogue mastering matrix vs. real wiring
English / English
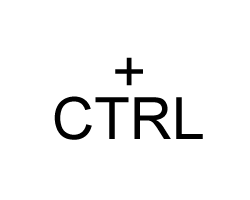
| STRG + bypass | The clicked device and everything below it will be bypassed | .
| ALT + bypass | The clicked device and everything above will be bypassed |
| STRG + Solo | The clicked device is activated in addition to those already switched to solo | .
| STRG + SHIFT + Solo | The complete solo group belonging to the clicked device is switched to solo | .
The device needs a DHCP server to get an IP address. Bridge the two network connections on your PC so the router's DHCP server can reach the device.
Control Panel → Network and Internet → Network ConnectionsBridge ConnectionsThe device will now receive an IP address from your router and will be found by the plug-in automatically.
Set a static IP address on your PC's Ethernet interface manually.
Control Panel → Network and Internet → Network ConnectionsProperties of the Ethernet interface connected to the deviceInternet Protocol Version 4 (TCP/IPv4) and click PropertiesUse the following IP address10.20.30.1, Subnet Mask: 255.255.255.0Then open the plug-in and enter the IP address of your device manually:
10.20.30.40 for the Schwerkraftmaschine10.20.30.41 for the Raumzeitmaschine10.20.30.44 for the Creme RCClick OK. The plug-in will connect directly to the device.
Set a static IP address on your Mac's Ethernet interface manually.
System Settings → NetworkConfigure IPv4, select Manually10.20.30.1, Subnet Mask: 255.255.255.0Then open the plug-in and enter the IP address of your device manually:
10.20.30.40 for the Schwerkraftmaschine10.20.30.41 for the Raumzeitmaschine10.20.30.44 for the Creme RCClick OK. The plug-in will connect directly to the device.
System Preferences->Shares, select Internet Sharing on the left. Share connection, select your internet connection (e.g. WLAN). With computer via: select the interface that is connected to the device. 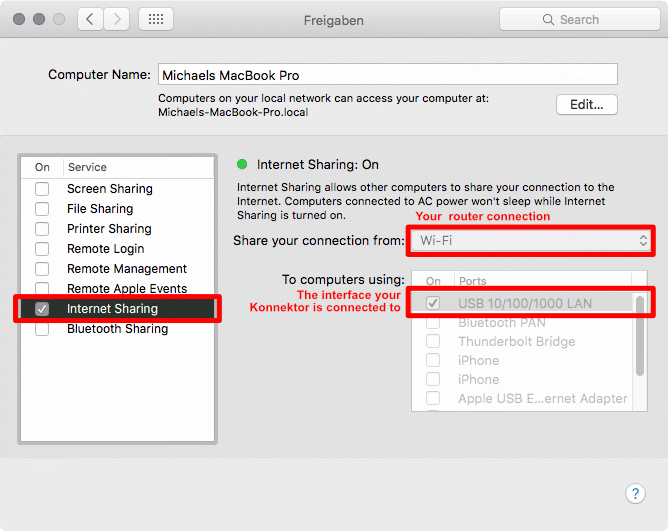
Tegeler Audio Manufaktur

End your inner battle between digital and analog.
© 2005-2026